April 16, 2024

Take Your Planks Up a Level

Get Fit Quick Tip:

Planks… Plus!

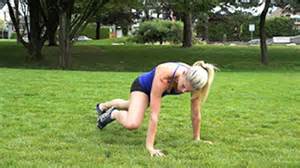
Take your planks up a level by adding in 2 additional moves:

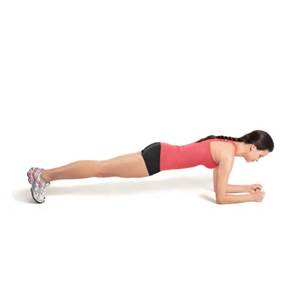
Begin in a plank, on your toes and hands. Keep your body straight. Next, lift up your right leg, bend your knee and pull your knee up toward your chest. Straighten your knee to complete 1 rep. Do 10 reps, then release. Repeat with your left knee. Do 10 reps.

Begin in a plank, on your toes and hands. Lift your right leg up off the floor about 6 inches. Keeping your knee straight, slide your leg out to the side about 10-12 inches, then return to the center to complete 1 rep. Do 10 times, then release. Repeat with your left leg. Do 10 reps.


*Consult your physician before performing exercise.


Ab Tuck and Crunch

Get Fit Quick Tip:

Ab Tuck and Crunch

If you’re looking to challenge your abs, try this move. Begin lying flat on the floor, next lift up your upper body with your arms in front of you for balance. Then, lift both legs up off the floor to your starting pike position. Next, exhale and pull both knees into your chest while stabilizing your torso in the incline position. Inhale and return to your staring pike position. Repeat 10 times.


*Consult your physician before performing exercise. This exercise is for those without injury concerns.

To challenge your abs…

Get Fit Quick Tip:

Elbow to Knee Plank

Want to challenge your abs? Add this exercise into your workout! Begin in a plank on your hands and toes. Lift your right foot up off the floor, next bend your right knee and bring it toward your right elbow. Extend your right knee to and return your foot to the floor to complete one rep. Next lift your left foot up off the floor, bend your left knee and bring it toward your left elbow to complete two reps. Repeat until 10 reps are performed.


*Consult your physician before performing exercise.

Plank for a strong core!

Get Fit Quick Tip:

Plank!

Strengthen the many layers of your core musculature by adding Planks into your fitness routine.

From a prone position, place your forearms on the floor with your elbows directly below your shoulders. Tuck your toes under and lift your body up off of the floor so your body is parallel to the floor. Pull your shoulders down into your body. Pull your belly button up. Tuck your chin into your chest to maintain spinal alignment.

From the basic plank position, many options exist for progressions:

Alternate lifting your right foot, then your left foot up of the floor.

Lift and hold one leg up off the floor.

Perform a plank with your hands on the floor instead of your forearms.


*Always consult a physician before beginning exercise.

Core Defined by Tera Busker

What is my core?

Your “core” is defined as your body minus legs and arms. The core is made up of approximately 29 muscles that include: the rectus abdominus, transverse abdominus, obliques, erector spinae, diaphragm, hip flexor group and the pelvic floor muscles.

Why should I strengthen my core?

What does the core have to do with working out? EVERYTHING!!!! When you are exercising
your legs and arms are doing the movements, but the core is really the star of the show. The core is the body’s best multi-tasker.

The Core:

• helps you stay balanced on inclines, declines and unstable terrain

• stabilizes the spine and keeps it erect

• acts as an “Internal Brace” by holding the ab muscles tight to support the back

• regulates your breathing

• assists in making your body move as efficiently as possible, which decreases the chance of injuries

If your core is weak it can lead to inefficient movements that could cause injuries or patterns of injuries. Strengthening this important area will lessen the chance of injuries, improve your posture and optimize your Overall performance.

How do I improve core strength?

Improving core strength is about selecting the right exercises for your individual needs.You are a unique individual, so your program will vary from the next person, but here are a few simple exercises that will start you down the right path:

Planks

1. Lie face down on mat resting on the forearms, palms flat on the floor.

2. Push off the floor, raising up onto toes and resting on the elbows.

3. Keep your back flat, in a straight line from head to heels.

4. Tilt your pelvis and contract your abdominals to prevent your rear end from sticking up in the air or sagging in the middle.

5. Hold for 20 to 60 seconds, lower and repeat for 3-5 reps.

Supermans

1. Lie on your stomach on a mat with your legs extended and arms extended overhead with palms facing each other. Relax your head to align it with your spine.

2. Exhale, contract your core muscles to stabilize your spine and slowly raise both legs a few inches off the floor while simultaneously raising both arms a few inches off the floor. Keep both legs and arms extended and avoiding any rotation in each. Maintain your head and torso position, avoiding any arching in your back or raising of your head. Hold this position briefly.

Birddogs

1. Begin on hands and knees with the back straight and the abs pulled in.

2. Lift the right arm up until it is level with the body and parallel to the floor.

3. At the same time, lift the left leg up and straighten it until it is also parallel to the floor.

4. Hold for a moment, lower and repeat on the other side, this time lifting the left arm and right leg.

Side Plank

1. Lie on your side on a mat with extended legs and stacking your feet one on top of the other.

2. Place your right elbow directly under your shoulder, align your head with your spine and keep your hips and knee in contact with the exercise mat.

3. Lift your hips and knees off the mat and keep head aligned with your spine. Keep your elbow positioned directly under your shoulder.

Hip Bridge

1. Lie on your back on a mat in a bent-knee position with your feet flat on the floor.

2. Place your feet hip-width apart with the toes facing away from you.

3. Gently contract your abdominal muscles to flatten your low back into the floor.

4. Exhale and press your hips upwards off the floor into extension by contracting your glutes. At the same time press your heels into the floor for more stability. Avoid pushing your hips too high as this generally increases the amount of hyperextension (arching) in your low back.

5. Inhale and slowly lower yourself back towards your starting position.

Tera Busker is an ACE Certified Personal Trainer and owner of Fitness To Go, an exclusive In Home & Private Studio Personal Training Service based out of Roberts, WI. www.fitnesstogo.net