April 27, 2024

Undo sitting with this hamstring stretch

Get Fit Quick Tip:

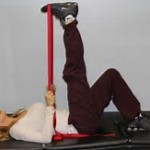
Lying Hamstring Stretch

Sitting most of the day? Do this hamstring stretch to ease lower body and lower back tension. Lie down on the floor on your back. Extend your right leg straight up with your heel toward the ceiling. Place a strap or belt securely under the arch of your shoes to assist your stretch. Keep your shoulders and hips on the floor. Hold for 10 seconds, then release. Next, extend your left leg straight up toward the ceiling. Place the strap or belt securely under your arch. Hold for 10 seconds, then release.


*Consult your physician before performing stretch.

Ease Muscle Tension by Jennifer Austin

Tense, stiff and sore muscles do not have to be a part of driving and traveling long distance! One rule to always remember is posture, posture, posture. Sitting in proper posture will make a significant difference in how you feel during and after hours in the car or on a plane.  Following a few basic principles will also help.

Take regular breaks. Taking a “stand-up” break every two hours will decrease muscle soreness from decreased circulation.

Change or shift your position often. Obviously, this is limited when seated. However, you can reset your posture often. For example, slide back in the seat if you’ve scooted forward. Sit up straight if you’re slouching.

Move your extremities often. That means wiggle your toes in your shoes, move your fingers, and circle your wrists and ankles if you’re able. Break up the monotony of sitting motionless for hours on end.

Stretch. Try the following upper body stretches to relieve muscle tension caused by traveling long distance. The following exercises may be done standing or seated.  Hold all stretches for 10-30 seconds. Make sure you’re breathing comfortably through each stretch. Stretch to mild tension, not pain. As always, consult your physician before beginning any exercise.

Lace your fingers behind your body. Pull your shoulders down and back; slowly extend your elbows pulling your hands toward the floor, and then pull your shoulder blades together.

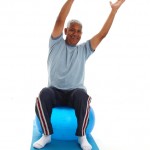
Reach both arms straight up overhead. Keeping your weight centered, slowly reach to your right, then reach to your left.

Lace your fingers behind your head, pull your shoulders down and back pinching your shoulder blades together; and then pull your elbows wide.

Pull your shoulders up toward your ears, then release.

Pull your shoulder blades together, then release.

Pull your shoulders down, tilt your right ear toward your right shoulder. Release and repeat, tilting your left ear toward your left shoulder.

Pull your shoulders down; rotate your chin toward your right shoulder. Release and repeat by rotating your chin toward your left shoulder.

Make a loose fist with both hands, slowly extend your fingers.


*Disclaimer: Results may vary from person to person.


At-Your-Office Stretching by Jennifer Austin

If you’re sitting at your desk all day and find that neck, back and leg aches are a part of your every day, there is a solution. Combining range of motion, stretching and deep breathing will reduce muscle tension, as well as release stress. Use each series below as your check list and simply follow as outlined moving from one exercise to the next. Stretching and range of motion exercises should never be painful. Ease into each exercise and start slowly. The following stretch and range of motion exercises are for those without injury or illness concerns. Consult your physician before beginning exercises.

To decrease low back tension:
Lift both heels 10 times. Lift your toes 10 times. Circle your right ankle 10 times. Then circle your left ankle 10 times. Extend and bend your right knee 5 times, extend and bend your left knee 5 times. Lift and lower your knees as in seated marching 10 times total. Keeping your torso upright, inhale and cross your right ankle over your left knee. Exhale and pull your right knee in toward your chest and hold for 10 seconds. Release this stretch. Inhale and place your left ankle over your right knee. Exhale and pull your left knee in toward your chest and hold for 10 seconds. Release. Inhale and lift your right knee straight up toward your chest. Exhale and hold for 10 seconds. Release your right knee back down to the floor. Inhale while pulling your left knee up toward your chest. Exhale and hold this position for 10 seconds. Release this stretch. Drop your chin to your chest and place both hands in your lap. Next inhale and “walk” your hands down your legs toward the floor. Exhale and “walk” your hands back up your legs to your lap to return to your seated upright position with your shoulders down and back.

To ease neck tension:
Inhale and shrug both shoulders up. Exhale and slowly pull your shoulders down and back. Repeat 5 times. Circle both wrists 5 times each direction. Inhale and reach both arms straight up overhead. Exhale and lean to the right, then lean to the left. Repeat 5 times. Inhale and lace your fingers behind your head. Exhale and pull your shoulders down and your elbows wide. Hold for 10 seconds. Release and lower your arms. Keeping your torso upright, inhale and drop your chin down toward your chest. Exhale and reach both arms out wide to the side of your body. Release your arms to the side of your body. Inhale pinch your shoulder blades together, exhale and release; repeat 5 times. Inhale and drop your right ear toward your right shoulder. Exhale and drop your left ear to your left shoulder. Inhale and lace your fingers behind your body, pinch your shoulder blades together and extend your arms. Exhale and push your hands toward the floor; hold for 10 seconds.
 

Is the Foam Roller for you? By Nicole Bryan

For an investment of just under $25.00 a Foam Roller offers provides many purposes and benefits to the everyday exerciser. Massaging muscles, offering a balance component to workouts, as well as providing an abdominal challenge and stretching are just a few of the uses. You’ll find varying lengths, however a 6 inches in diameter and 3 foot length foam roller is the most versatile for many. Proper body mechanics are important when using the foam roller. This means pay attention to your body position as you’re working on the roller. As always, consult your physician before adding in this or any new component to your exercise regime.

Rolling on the foam roller should not be painful. It’s important to keep the roller moving much like a massage. Roll up and down your muscle only. For example, place the foam roller perpendicular to your body just under your calf or lower leg muscle. Position the roller to be under only one leg at a time. Sit on the floor, stay seated on the floor or for more pressure on your calf muscle, lift your body up on to the roller. Roll up and down your calf muscle about six inches of total movement. Keep the duration of your rolling limited to less than a minute at first.

The foam roller can offer a balance challenge to your workouts. Because of the round shape, your body must work to stabilize the roller. For example, lie on the roller face up lengthwise with your knees bent and your feet flat on the floor. Now move your feet and knees together and place your arms across your chest. Hold for 10 seconds before returning your hands to the floor to help balance.

Adding an abdominal challenge to your workout using the foam roller provides unaccustomed work for your muscles. For example, begin on the floor on your hands and knees. Place the roller under your knees. Pull your belly button up toward your spine, pull your shoulders down. Hold your torso and the roller in place. Now lift your right hand up off the floor and hold for five seconds. Return your right hand to the floor, and lift your left hand up off the floor and hold for five seconds.

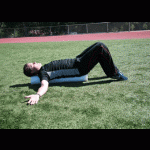
Stretching on the foam roller allows gravity to assist your stretch without allowing any compensatory patterns. For example, lie on your back lengthwise on the roller. Keep both knees bent with your feet flat on the floor. Now reach both arms straight out along side your body and roller with your palms up.

Check out this super versatile and multi purposeful piece of exercise equipment next time you are at the gym. Consult a Fitness Professional to outline specifics for you and your workout program. Roll, improve balance, challenge your core and stretch for posture all on one foam roller!

Relaxation in 3 by Nicole Bryan

Night-Time Stretches for Relaxation

Next time you’re stressed out or can’t relax to sleep, try the following stretches for relaxation. Hold each stretch for 15-30 seconds and continue breathing at your own relaxed pace throughout the stretches.  Perform each stretch two times. (Consult your physician before performing exercise. Discontinue stretching if painful)


1.    Inhale drawing a single knee towards your chest.  Exhale and release the leg to the floor.  Inhale while drawing the other leg into your chest.  Exhale and release the leg to the floor.


2.    Move into the crawl position (on your hands and knees) Inhale rounding your back up to the ceiling.  Exhale let your belly button fall to the floor.


3.    Inhale while in the crawl position; exhale sitting back on your heels and dropping your chest to the floor and reaching your arms forward.


Notice the breathing and movements work together. Focus on breathing in good clean air and releasing your tensions with your breath out. You may simply blank your mind or focus on your breathing. You’ll feel relaxed instantly!

How to Exercise at your Desk by Sarah Johnson

We realize it’s sometimes tough to fit in exercise during the work day, especially with all of the family activities you have planned before and after your 9-5!  But taking even a 5 to 10 minute break during your work day can help you de-stress, re-focus and gain energy.  And you don’t even have to change out of your work clothes!

Try these desk exercises the next time you need a pick me up at work:

Chair Squats (Sit to Stand)
Stand shoulder width apart in front of your chair and lower your body down as if you are about to sit back in your chair.  Then press through your heels back up to a standing position. (If your chair has wheels make sure it is against a wall!)

Desk or Chair Dips

While sitting on your chair, place your hands on either side of you-palms facing back. Take a step forward and lift your hips off the chair and slightly forward. Lower your body down by bending at your elbows and push back up to the starting position by extending your elbows.

Desk Push-ups

Place your hands on your desk slightly wider than shoulder width apart. Walk your feet back so you are in a straight line from head to heels.  Lower your chest towards the desk while keeping your back flat, then press up to the starting position.

Wall Sits

Place your back against a wall and take a step forward with both feet. Slowly lower your body down until your knees are at a 90 degree angle (if that is too far, go only as far as you can). Hold this position with your arms relaxed at your sides, or with computer on your lap.

Follow Sarah on Twitter @SarahJChicago

Is Stretching Important? By Sarah Johnson

Is stretching important in fitness?

There has been some recent controversy as to whether stretching is important: Does it actually prevent injury? Should you stretch before or after a workout? Why should I stretch at all? Whatever you may have heard, I’d like to share my reasons why I believe stretching has its place in a fitness program.


• It helps establish your intentions. Take a few minutes after your warm-up to stretch. Remind yourself why you are doing this; what your goals are and how is this activity going to help you get there.

• It lets you think about your plan. When you set out for a run, walk, hike or any other activity, beginning with a light warm-up and stretch gives you a few extra minutes to think about your route, to clear your head or plan for any obstacles you may encounter.

• Stretching helps you focus. Instead of jumping right into the workout without thinking, you can spend a few quiet minutes lightly stretching, making sure your mind is in the present without any distractions. No matter what your belief is about stretching preventing injury, an unfocused & distracted person plus exercise can be a recipe for an injury!

• It also helps you wind down. After a grueling workout or long training session, five minutes spent relaxing your mind and loosening your muscles is the best way to think about your accomplishment!

By the way, I do believe stretching is most successful when done after your body and muscles are warmed up, when they are most loose and pliable. And as far as if it’s even worth doing (as some have argued), if it feels good and you have the time for it, I say ‘Why not!?’

Follow Sarah on Twitter @SarahJChicago

The Fountain of Youth by Daphne Haddock

3 Steps to Optimizing Your Exercise Program

Optimize your fitness program and incorporate the following 3 types of training to continue to look and feel young:
• Strength Training
• Interval Training
• Flexibility Training through Yoga

Strength Training:

Prevent the age related decline in muscle mass through strength training. If you are inexperienced, incorporate weight training with a personal trainer to insure proper form and to avoid injury. Strength training will increase muscle mass and boost metabolic rate. By boosting your metabolic rate, you will also be burning more calories at rest or sleeping. Incorporating strength training 2-3 times per week is ideal.

Interval training:

Interval training is the most efficient type of aerobic training. It is a short burst of a high intensity exercise followed by a longer period of a lower intensity exercise. Interval training forces your body to use more oxygen and burn more calories. The increase use of oxygen will also boost detoxification in your body.  Combine interval training with your 2-3 strength workouts per week.

Here is an example of a simple interval workout:

Step 1:

Start by jogging or cycling for 5 minutes at a 50% effort.

Step 2:

Run or cycle for 60 seconds at about 90% of your all out effort.

Step 3:

Finish the steps by slowing down to 60% effort for 90 seconds.

Repeat Step 2 and 3 –5 times then finish with a 5 minute cool down at a 50% effort rate.

Flexibility training:

Flexibility training is often overlooked in one’s exercise program, but integrating it will help improve your overall performance. A great way to add flexibility training to your program is to incorporate an hour of yoga a week into your exercise routine. This will help your body remain flexible and agile. Staying flexible will reduce your potential for injury. Yoga is also great for reducing stress and boosting relaxation.

Incorporate those 3 steps into your workout routine to keep looking and feeling young! Be sure to obtain medical clearance before beginning any exercise program.

Written by Daphne Haddock / Nutrition and Yoga coach with www.PersonalPepper.Com.

Why YOU should be using the Foam Roller by Charlene Ragsdale

If you are an athlete – you most likely will suffer from aches and pains at some point. It’s a mixed blessing. Sore muscles are proof that you are getting stronger, but on the other hand, it can cause a great deal of uncomfortable stiffness which can affect your sleep, work and daily lives. As an endurance runner, I learned of the benefits of foam rolling, early on my career. Foam Rolling is now a part of my daily plan and I recommend it to my coaching clients.

What is a foam roller? A long, hard Styrofoam or rubber-like tube. You will notice many use it at the gym or at an athletic event.

Why foam roll?
Helps prevent common injuries. One of the most important reasons for a regular foam-rolling routine is to prevent those too common exercise-related injuries. Foam rolling every day ensures you are massaging away buildup in your muscles.
Keeps you flexible & limber. Building up your flexibility is key for any athletic and fitness routine. Stretching and massaging your muscles can help combat tightness experienced from sitting after exercise for example.  

Things NOT to do with Foam Rolling
Never roll on the bone, only the muscles. This is particularly true with the shin area.  Roll off to the side of the shin bone, not right on the shin. Rolling is for muslces, tissues and ligaments, not for bones.
Never roll after icing.  Always roll PRE-icing.  Never roll on icey-cold muscles, but you can roll after a massage or heating pad. 

Rolling can be a wonderful part of your day, whether its a workout day or a rest-day.  It helps eliminate the kinks and knots in your back/neck, after exercise and also after a long day sitting at your desk.  As an athlete – rolling is essential, not a luxury.

Charlene Ragsdale is a RRCA Certified Running Coach, IFA Certified Sports Nutritionist and member of the USATF Master’s All-American Team. She can often be seen at on the podium as a frequent Age Division & Overall Winner in several distances. She lives with her Chef husband, two sons and two dogs in Las Vegas, NV. You can follow her at her blog:  www.RunningWithCharlene.com